Are you ready to add a special touch to your accessories? Are you ready to upgrade your home decor? Don’t waste time. Let’s step into a new sewing world to sew a bow! Accordingly, most bows on the market are made of fabric, so today we will mainly focus on how to sew a fabric bow.
Various Uses of Bows
As one of the most timeless adornments, bow-making likely dates back to the early Middle Ages, when the invention of the horizontal loom allowed for the creation of more complex woven textiles. At that time, bow-making was really a trend.
Back to today, a bow is still an important accessory for you to add a touch of beauty, charm, and cuteness. Not only can bows be used as a hair accessory for kids and adults, but they can also be clipped to your headband, purse, or clothing embellishments to add a feminine look. You can use a bow tie to match suits, too. Or you can clip them to the ribbon of a gift to add more surprise. Or use them as a kind of decoration for your home or party. You can even clip them to your dog’s fur for fun!

5 Common Bow Styles
In addition to bow uses, bows come in different types of colors, patterns, or styles. So next, here’s a list of 5 common bows.
- Classic Bow: Gather a square piece of fabric with a single layer in the center to make the bow shape to create a classic bow.
- Loop Bow: It’s quite easy to make a loop bow. All you need to do is loop the ribbon around and around, and then tie up the middle second.
- Layered Bow: A layered bow is one that has several traditional bows or loop bows layered on top of one another. The most special point about it is that it can consist of many different colors, patterns, or styles to form a unique design.
- Pinwheel Bow: Twist a long strip of fabric or ribbon to make a pinwheel bow.
- No-Sew Bow: Making a no-sew bow may sound impossible, but with a hot glue gun, you can make all kinds of bows in all sizes and shapes.
After knowing so much about the uses and styles of bows, won’t you be more excited about learning how to sew a bow by yourselves?
Is It Hard to Sew a Bow?
For most beginners, most of you have no experience in the sewing world. So you might be quite nervous about the process. But is it really hard to sew a bow? The answer is obviously “no.” With the following step-by-step tutorial, any of you can sew a bow successfully!
Gather the Necessary Materials and Tools
Most importantly, it is always a good habit to prepare all the things you need before starting to sew a bow. Whether you sew by machine or by hand, the following list will give you specific suggestions and every detail you need to know.
Prepare Your Fabrics
When it comes to materials, you can use fabric scraps, ribbons, or any other materials you have on hand to sew a bow. For beginners, we suggest that you make a fabric bow, which is easier than other materials. You can literally use any kind of fabric you like. And the easiest fabric is cotton, which can help you hold your bow shape better. However, if your fabric is soft and thin, like silk or polyester, adding some fusible interfacing will help a lot.
Remember to wash and iron your materials to make sure your fabric bow looks neat and professional afterwards.
(Shop on Longancraft to find more beautiful fabrics to sew your unique bow!)
Needles
For needles, choosing a medium-sized needle is completely enough to sew a bow. It will help you pierce all the layers of the fabric easily, whether you sew a bow by machine or by hand.
Thread
To make your bow shape strong and solid, we recommend durable polyester thread to sew a bow. It is one of the strongest threads on the market. Not only can it provide the strength you need, but it can also provide strong and long-lasting stitches for your bow.
The different colors of thread can create different feelings. If you prefer the integrity of your bow, choose a color similar to your fabric. If you want to make a more eye-catching bow, choose a contrasting color.
Cutting
As an easy-to-handle material, a pair of sharp scissors is good enough for cutting fabric. But to cut sharp and precise shapes, the best tool is a rotary cutter with a self-healing mat. Rulers and erasable pens are also needed to mark the shape to help you sew a bow easier.
Sewing Machine
If you are trying to sew a bow by hand, just skip this tip. But if you have a sewing machine, it will make your sewing process much faster and easier. In addition, a regular home sewing machine is enough. You don’t need to use a serger.
Alligator Clips for Bows (Optional)
Prepare some alligator clips if you are making a hair bow. These clips come in various sizes, so just choose a right one.
5 Step-by-Step Tips on How to Sew a Bow
Since you have know all the necessary materials and tools, now it’s time to make your own DIY bow! Follow the below tutorial!
Step 1: Cut the Shape
Before cutting, please read the chart of the most common bow sizes.
| Size | Center Strip | Bow Body | Final Size |
|---|---|---|---|
| Mini | 1/2″ x 2″ | 3 1/2″ x 3 1/2″ | 3″ x 1 1/2″ |
| Small | 3/4″ x 2″ | 4 1/2″ x 4 1/2″ | 4″ x 2″ |
| Medium | 1″ x 2″ | 5 1/2″ x 4 1/2″ | 5″ x 2″ |
| Large | 1 1/2″ x 2″ | 6 1/2″ x 6 1/2″ | 6″ x 3″ |
Choose your preferred size, and cut a big rectangle as the bow body and a long strip as the center part.
If your material is too soft or too heavy to keep a nice and crisp shape, add fusible interfacing on the back.
Step 2: Sew the Bow Body
Fold the big rectangle in half lengthwise, with the right sides together. Sew down the open side with a 1/4″ seam allowance, leaving a small opening in the middle about 1/2″ long for turning.
Cut the excess corners out without cutting the seam.
Then turn the bow inside out from the opening and press the seam to the center. Use your iron on a high setting, and press the bow to make sure the opening and the raw edges of the seam are flat.
Step 3: Sew the Center Strip
Similarly, fold it in half. Bring the long edges of the strip right sides together. Sew it down with a 1/4″ seam allowance.
Then press it flat.
Step 4: Stitch the Center
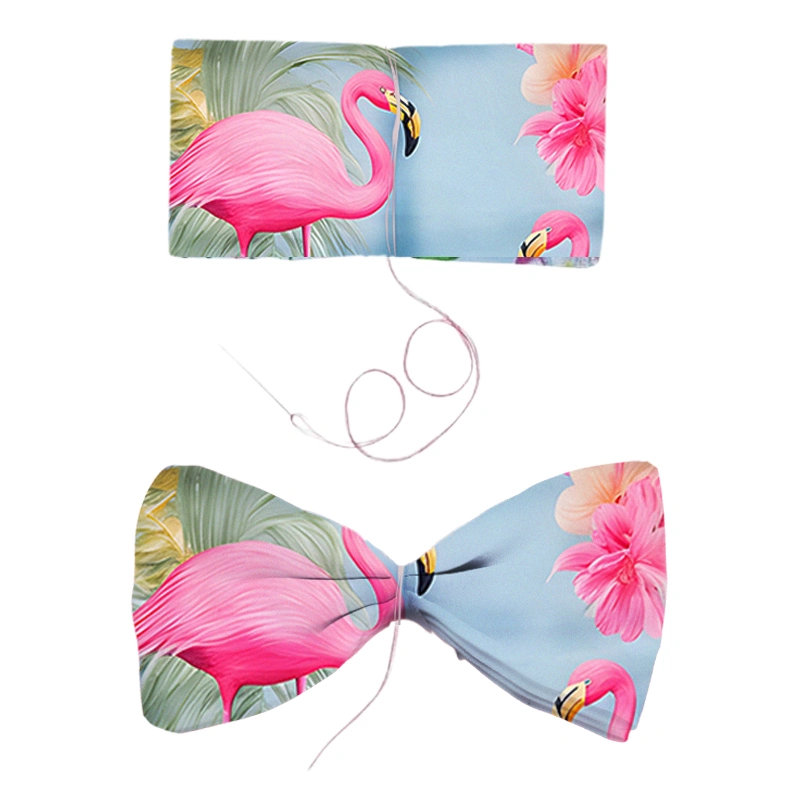
Thread up a needle with a long piece of double thread and make a running stitch in the center of the bow body.
Then pull the thread tight to gather the center. Arrange the folds with your fingers, and use the thread to wrap around the center several times.
At last, knot it off double to ensure stability.
Step 5: Attach the Center Strip to the Bow Body
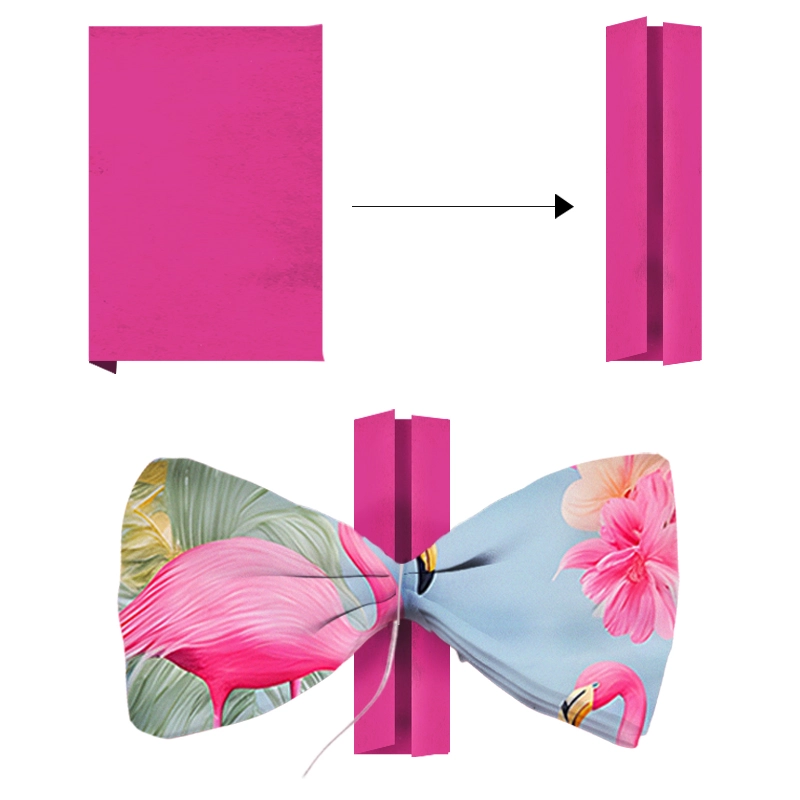
Place your bow body around the middle of the strip with the seam facing up. They use the strip to wrap around and around. Stitch the ends at the back of the bow, and try to use an invisible stitch to make the bow look professional.
One more step: you will probably need to cut off the extra length on the bow center.
Step 6: Add a Hair Clip (Optional)
There is an optional step if you are making a hair bow. You can add the clip to the back of the bow with a lot of hot glue. Wait for the glue to cool down, and a hairbow is finished.
Can DIY Fabric Bows be Used as a Bow Tie?
Actually, your DIY fabric bow is different from a traditional bow tie, which is made from a long-shaped fabric. The patterns are more complicated than a common bow, and the sewing process will be much more difficult. So if this is your first bow-sewing project, we won’t recommend you make a bow tie.
But if you really want to use your DIY fabric bow as a bow tie, button it up to the top and use a clip to hold it in place.
How to Make a No-Sew Bow
Instead of needles, thread, or sewing techniques, making a no-sew bow is much easier. Just prepare a hot glue gun to gather the bow body and the center together.
After making the bow body, fold the fabric in the center three times.
Use a dot of hot glue in the creases of the previous folds. Then flip it over and use the hot glue again. If you don’t have hot glue at hand, you can use double-sided fabric tape as an alternative. Remember to cut small pieces of the tape that will fit inside the folds.
At last, place a dot of hot glue in the center of the bow. Press the end of your bow strip to the glue and wrap it around and around. Cut the excess and use hot glue at the end of the strip.
Conclusion: 4 More Tips to Sew a Bow
- For beginners, sew a small-sized bow to practice your sewing skills.
- Choose a lightweight fabric to make the process easier to fold and sew.
- Use pins to secure the fabric in place during sewing.
- Sew patiently to ensure even and flat stitches.
It’s both an interesting and worthwhile sewing project to sew a bow, which can add a special touch to you on many different occasions.
Next time, if you have some scrap fabrics, instead of throwing them away, why not use them to make your own unique bows? With a little time and patience, you can make various styles of bows!
Find more stylish hairstyles with bows on 12 Chick Bow Hairstyles for All Occasions.
Read more sewing tips on Longan Craft Blog!