To sew a lapped zip, start by leaving a 1-inch seam allowance for the zipper before cutting your fabric. Position the zipper under this, stitching along the right and left sides of the zipper. Topstitch along the edges and use a satin stitch to reinforce the top. Enjoying this? If you hang on, there are more professional tips lined up!
Key Takeaways
- Start by leaving a 1-inch seam allowance for the zipper and mark a 1-inch line for the seam at the top of the zipper opening.
- Fold and press the seam allowances and place the zipper underneath, stitching both sides securely.
- Reinforce the top of the zipper with a parallel or satin stitch for durability and a professional finish.
- Trim any extra zipper tape after reinforcing the top to reduce bulk and ensure a neat appearance.
- Use different sewing techniques to make your sewing look more appealing.
How to Sew a Lapped Zipper
Now, let’s focus on the practical steps of sewing a lapped zipper. You’ll start with a generous seam allowance, marking and sewing a precise line for the top of the zipper opening.
You need to fold, press, and sew the seam allowances to make a neat base for the zipper. This will give your clothing a professional and polished look. Now I will offer the easiest and most straightforward set of guidelines.
Step 1: Leave a 1-inch seam allowance for the zipper before cutting the fabric.
Make sure to leave a 1-inch zipper seam allowance before cutting the fabric. This will help when inserting the zipper and ensure a clean and secure attachment.
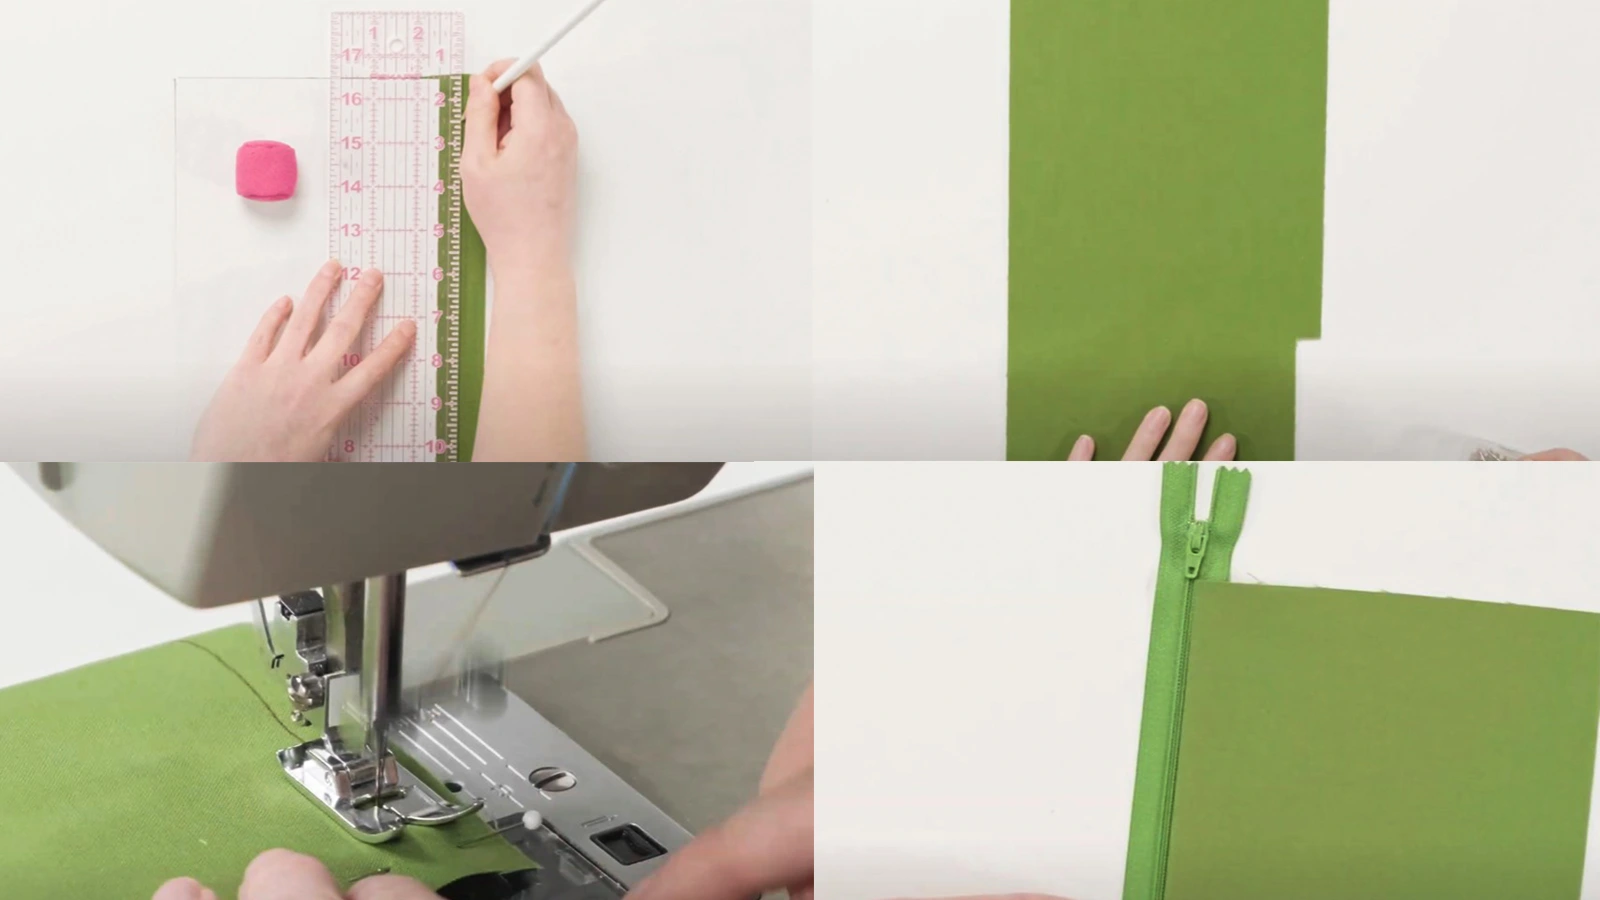
Step 2: Mark a 1-inch line for the seam at the top of the zipper opening on both side seam allowances.
To make sure your lapped zipper fits perfectly, mark a 1-inch line at the top of the zipper opening on both side seam allowances. This marking serves as a guide, defining the placement of your zipper.
Take a fabric marker or tailor’s chalk and carefully draw this line across the top of the zipper opening. This is a crucial step in sewing zippers, as it provides the boundary for your stitching and helps maintain accuracy.
Step 3: Set the stitch length at 0, then sew the horizontal seam under the zipper several times.
Mark your desired position, then set the sewing machine’s stitch length to 0, and sew the horizontal seam under the zipper multiple times to make it stronger. This step is crucial for secure zipper attachment and for maintaining the integrity of your garment over time.
Step 4: Fold and press the 1-inch seam allowance on the left side of the zipper area.
To sew a lapped zipper, fold the 1-inch seam allowance on the left side of the zipper area towards the wrong side of the fabric. This precise fold is essential for a neat and professional finish.
With your fold in place, it’s time to press. Using a hot iron, press along the folded seam allowance to create a crisp edge. This step is crucial to ensure a smooth zipper insertion.
Step 5: Press 7/8 of 1-inch seam allowance to make a zip underlay on the right side of zipper area.
Create a sharp fold on the left side of the zipper area. Then, focus on the right side by pressing 7/8 of the 1-inch seam allowance to make the zipper underlay. This crucial step prepares your fabric for the forthcoming attachment of the zipper in a lapped style.
Step 6: Place the zipper under the zip underlay and stitch the right area of the zipper.
Are you ready to secure your zipper?
Place the closed zipper under the zipper underlay, making sure the right sides are up and the zipper teeth align perfectly with the underlay fold. This is a critical step when you sew a lapped zipper.
To maintain accuracy, ditch the pins and secure the zipper in place using tape. Now, it’s time to stitch. Start sewing from the bottom of the zipper, following the folded edge of the fabric up to the top of the zipper.
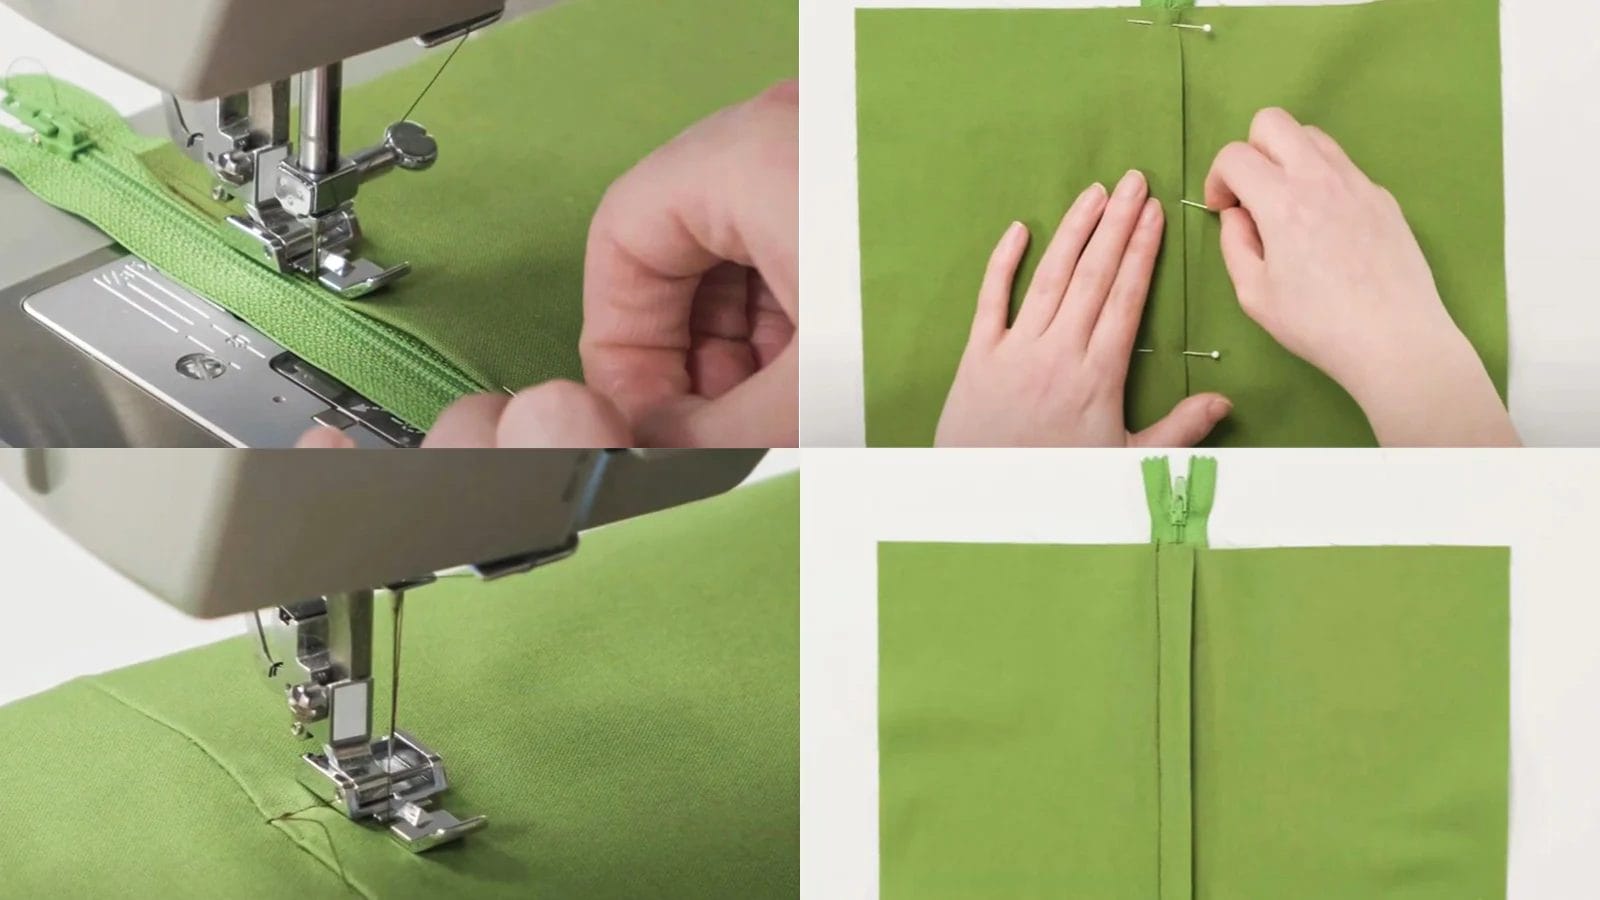
Step 7: Stitch the left side of the zipper along the fold line.
Now, let’s secure the left side of your zipper by stitching it close to the folded fabric edge for a neat and professional finish. Start by aligning the zipper tape with the seamline. Make sure the zipper’s coils are snug against the fold.
Next, using a regular stitch length for durability, stitch the left side of the zipper tape. Ensure your stitches are aligned close to the edge of the fold.
Step 8: Align the central seam on the left and right sides and secure them with tape.
Before moving forward, ensure you’ve precisely aligned the central seam edges on the left and right sides of your fabric. This is a crucial step when learning how to sew a lapped zipper.
Once you’re sure of the alignment, secure the central seam edges with Sewers Fix-It Tape. This nifty tool is a game changer, helping maintain alignment and preventing any unwanted shifting during the sewing process.
Now, you’re ready to move on to the next step.
Step 9: Place the 1/2 inch wide tape along the middle seam on the left and right sides.
To ensure neat sewing and consistent alignment, use a 1/2 inch wide tape along the middle seam on the left and right sides of the fabric. This tape will serve as a guide, helping you maintain an even seam line.
Step 10: Topstitch along the edge of the tape, then remove the tape.
Sew along the zipper tape to secure it and create a neat finish for the zipper. Use clear tape as your guide to keep your stitches straight and even. Remember, the seam allowance should be consistent to maintain the integrity of your work.
When you’re satisfied with your topstitching, carefully peel off the tape. The result is a professionally finished lapped zipper, securely fastened and ready to withstand the demands of daily use.
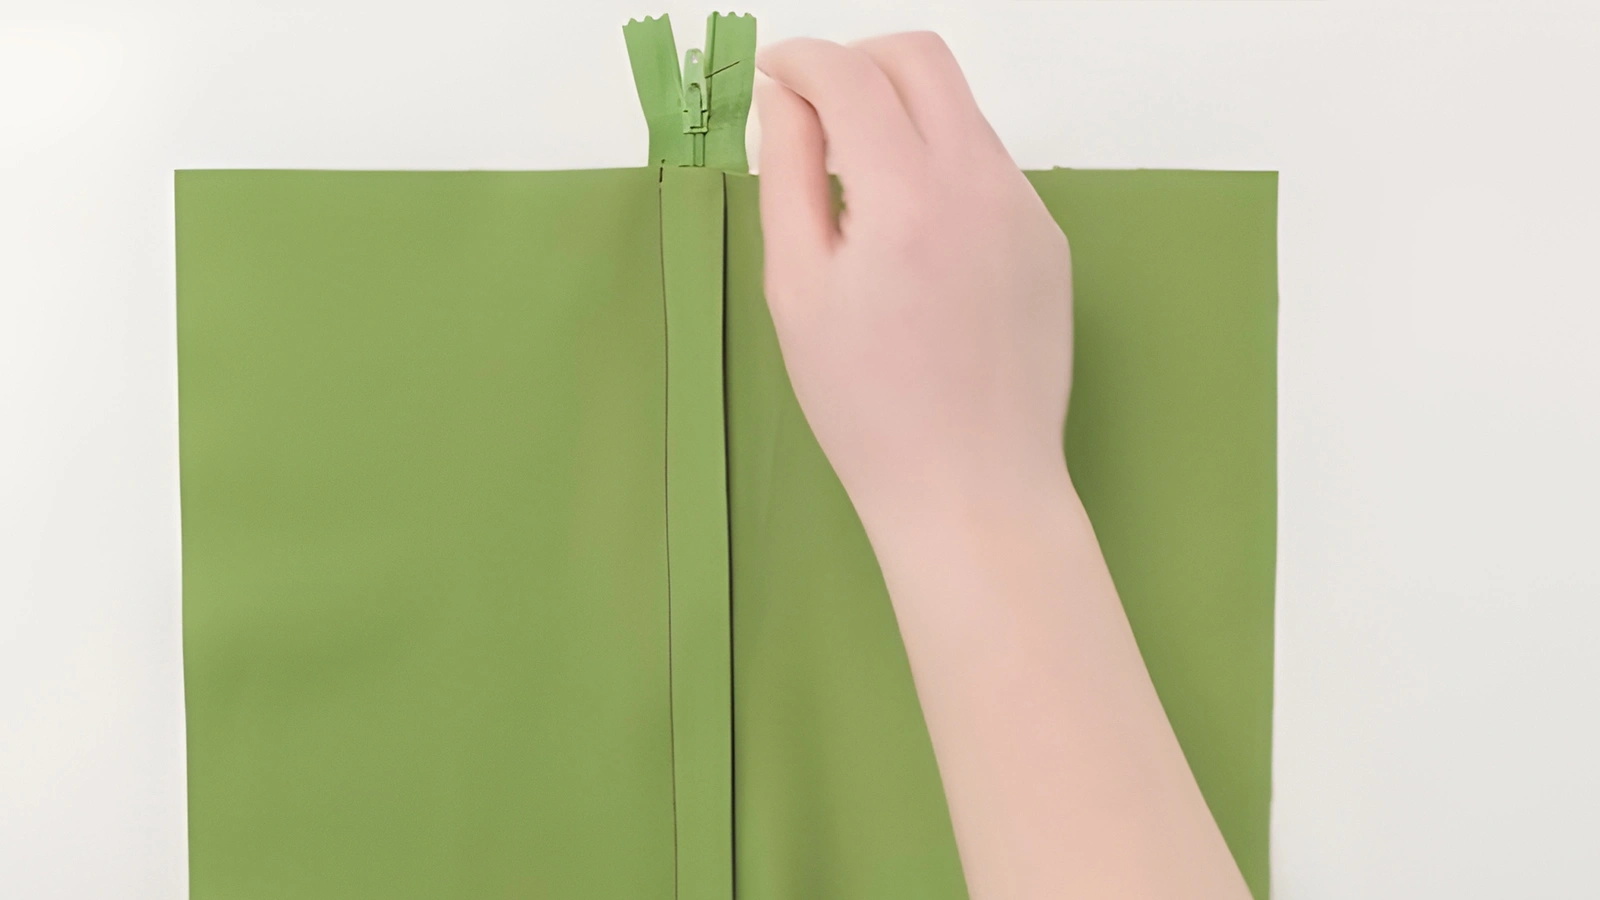
Step 11: Use stain stitch to reinforce the top of the zipper.
To ensure the zipper remains secure, strengthen it by adding a satin stitch at the top after completing the topstitching.
Place the needle at the top of the zipper and start sewing, making sure that the stitches are aligned with the edge of the zipper. The satin stitch serves to secure the zipper in place, preventing it from coming loose over time.
Step 12: Trim the extra zipper tape.
After reinforcing the top of your lapped zipper with a satin stitch, you’ll want to move on to the task of trimming the excess zipper tape.
First, inspect the area around your zipper. Any zipper tape extending beyond your seam allowance is considered excess and needs to be trimmed. Use sharp scissors to ensure a clean, precise cut. Be careful not to cut through the stitches holding the zipper to your fabric. This trimming process should be done evenly on both sides for a polished look.
Conclusion
Congratulations! You’ve just mastered the art of sewing the lapped zip. With patience and practice, you’ve navigated through each step, proving that no sewing challenge is too daunting for you.
Now, with this new skill in your repertoire, you’re ready to tackle more complex projects. Keep honing your skills, and soon, you’ll be sewing like a professional.
Remember, each stitch is a step towards perfection. Happy sewing!
Learn more sewing tips on Longan Craft Blog! Dive into the fabric world with Longancraft!